Search This Blog

Friday, June 03, 2011

Steps

Today I thought I'd share with you some of the steps I take in making one of my wall hangings. The images in this first step were taken from a fat quarter I bought when we were in Australia. I love the images but just couldn't leave them alone and use the fabric as I bought it. Today I surrounded them with dark brown. The same images have appeared on the last two wall hangings but with different fabric around them.
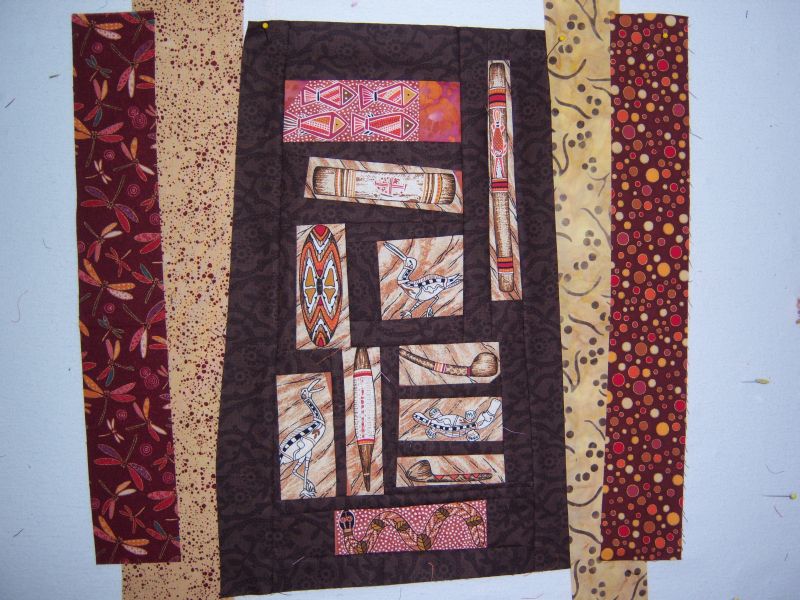


The next step is to add a few more fabrics. I auditioned several before I decided on the ones in this photo.


Here I am trying out some insert fabrics and some different colors of rick rack.


The only thing I might love more than rick rack is piping. I used red piping to set off the dark fabric. If you want to use piping I can't recommend highly enough getting a special piping foot for your machine. I have been told that a zipper foot works just as well. Not so.
I have also started trying out some of the ornaments I have on hand.
There will be many more changes before this one is finished. I think it needs another color, possibly blue or maybe the green from the previous picture. Or maybe only a little blue bling if I can find exactly the right piece. Thrift shops, here I come!

Thursday, June 02, 2011

Fabric


In case anyone else fell in love with this fabric, here is the designer. She also has more wonderful fabrics that I now covet, especially this one in blue.
You can see more of Yuko's fabric here.

Monday, May 30, 2011

Fabric Indulgence


I went to the fabric store to get a new light bulb for my sewing machine and came out with these two delicious pieces of fabric. And the best part is that they were on sale for half price. I did remember the light bulb too. Bonus!

Saturday, May 28, 2011

Adding Bling

Now I have quilted it and enveloped it instead of binding it. The tassels are sewn on as well as some of the dangling beads. I'll add more beads and shells to it and rings in each upper corner for hanging. The middle loop will probably change. I'm not sure what color it should be but that piece doesn't seem to work. It may need to be narrower too.

Co-operative Quilting


Yesterday, my friend, Brenda, and I decided to co-operate on a wall hanging. We chose fabrics that would suit her room and then played with them on the design wall. Sorry the picture is a bit crooked and dark. When the inspiration strikes it's hard to focus on photography. Also it was taken late in the day so the light wasn't very good. We are hoping to work at it a bit more today.


I have also updated this one with another strip of the mauve fabric. I like it much better now. Today I'll sew on the rick rack and plan the beads and other bling.

Wednesday, May 25, 2011

On a Roll


After I finished the doggie quilt I couldn't resist playing around with my Australian fabrics again. Before I knew it, this was up on the design wall.
My main question is, does the blue and black strip on the right look too different or does in seem to belong?
Of course, there will be lots more bling before it's done but I don't want to sew it together until I'm sure about the blue/black strip.

A Done Deal


I just finished sewing down the binding by hand. It ended up about 22x28 inches. I used the red binding according to the wishes of the recipient. I quite like the red and don't think it makes it look too busy (can a wall hanging be too busy???) which was my concern.

Tuesday, May 24, 2011

Red or Black


Today I made the extra row of dogs and assembled the quilt. Now I need to decide on red backing and binding or black... It may be a bit too busy to add another color on the border. What do you think?
I'll probably quilt it very simply.

Monday, May 23, 2011

Doggie Love


I have made several more blocks, narrowed the black sashing and added some rick rack. I like the idea of red down the middle of the black. I may audition that tomorrow. I may make one more row of dog blocks to make it rectangular. Right now it is about 24 inches square. The dog in the lower right corner with no rick rack will probably be moved to the center. The rick rack just didn't work on that block for some reason.

Doggie Love


I have started a new wall hanging for a dog lover. I have auditioned two different sashings. I think I prefer the black so far but is it too heavy for the blocks? There is also the red that I have used on the top of the left block that could be used as sashing. Also adding words is still an option.


Sunday, May 22, 2011

Is It Done?


I think this one is done except for finding a nice branch to hang it from. It's been raining hard so I won't do that today. The shells on the right side don't show up much in the photo but look nice in real life so I left the ones I had sewn on and added more.
Please ignore the light switches at the bottom of the photo. This is just a temporary home to get a good picture.
Does it need more bling?

Saturday, May 21, 2011

Adding Bling


I have spent the day so far adding bling to this wall hanging. I am not fond of hand sewing so this is the slowest part for me. I added a row of shells on the far left and some on the right. I think the ones on the right may have to go. They don't show up at all. I'll look for something more shiny for that area. I may add some more beads to the bottom and something to balance out the strong red circle on the far left.

A Finish


This one is all done including the hanging sleeve. I am quite happy with it. Now I hope to finish the beaded one that I posted about yesterday. It's raining so no outdoor activities will distract me.

Friday, May 20, 2011

Some Bling


I have sewn it together, added rickrack and now am deciding on bling placement. At this point I'll probably quilt it, back it and then make a final decision on which adornments to use and where to place them. I plan on finding some sort of branch to go through the top as a hanger. The two end pieces are loops and the middle will be the gold ring. It looked too heavy in the middle when I put a fabric loop there.
It seems to need something to counter balance the red circle on the far left so there will probably be some beads or something there. Then I'll need a few on the right to balance that out.
Any comments or ideas on finishing details would be appreciated.

Prize!


I recently won a prize over at Dye Candy. I absolutely love the rainbow of fat eighths and she also threw in a set of quilting fridge magnets. You might want to visit her Etsy store at Dyecandy to purchase on of her wonderful snow dyes. I was torn. It took me several days to make up my mind but I knew I would never be able to cut into the snow dyes...
Thanks so much for the gift, Chris. I love it.

Wednesday, May 18, 2011

The Next Step


I have changed the side pieces a bit. I'm debating whether I'll put on a hanging sleeve or tabs and hang it from a piece of wood...
There will be lots more bling added to it I'm sure. I do like the cured bottom but not sure about the top.

Monday, May 16, 2011

Wall Hanging


I've added some strips to the wall hanging. I love the circles and dots on the Australian fabric. It will also get some embellishments.
So far it measures about 16 inches each way.

Sunday, May 15, 2011

New Wall Hanging


I started this wall hanging this morning using many Australian fabrics. It is just started and not much is sewn together. I think the very light strip will have to go unless I add something over most of it. The wide strip on the left will probably get cut into narrow pieces...Who knows where this adventure will end.

Friday, May 13, 2011

All Together Now


Not a song. A fact.
Sometimes you just have to say it's done and start sewing it all together. I quite like it now but have no idea how I'm going to quilt it. Since it has uneven edges I'll probably do it on my DSM (Domestic Sewing Machine). It's about 40x46 so it won't be too much of a challenge.
But how to quilt it???

Thursday, May 12, 2011

Flirt Skirts

I received a review copy of Flirt Skirts a few days ago.

If you are learning to sew and want to make skirts, Flirt Skirts by Patti Gilstrap and Seryn Potter would be a good book for you.
The first section deals with the basics: Your workspace, sewing machine and other necessities for garment making; how to determine size and fit; using the templates and patterns included at the back of the book and building the basic skirt, instructions that apply to any of the skirts.
The rest of the book deals with three basic skirts - A-line, pencil and flare. For each type of skirt the authors have given basic instructions and also variations or decorations for personalizing each style. Many of them are interesting and not too challenging for a beginning seamstress.
My biggest problem with this book is the illustrations. While I appreciated the fact that the models looked like real people, not rake thin professionals, I was not very impressed with the choice of fabric and color used in the skirts. Many of the fabrics were bold prints that disguised the details they were trying to illustrate. Also, I did find that several of the color combinations seemed to clash with each other, but that could be just my taste.
That being said, I think you would find this a good basic book on skirt making. The 20 designs from the three basic skirts would be a starting point for your own creations.

Wednesday, May 11, 2011

Checking Values


I often check the values by using greyscale. I can see a couple more options when I look at it this way.

Tuesday, May 10, 2011

Which Way is Up??


Flipping it makes quite a difference. It still needs an extra white block though.

Putting It All Together


I have started to assemble the blocks that I have made so far. It's very interesting because none of them are square. I could have trimmed them to be all the same size and square but I'm hoping this will be a bit more interesting.It's certainly more challenging! The second and third rows down from the top are mostly put together. Right now I'm wondering if it looks balanced or heavy on the left side. I'll probably put some kind of plain (ish) border around it and then see if it looks finished or if it needs something else.

Sunday, May 08, 2011

How Many Do I Need?

I made a few more blocks for this quilt this morning. They are all about 6 inches not square. I'm wondering where to take this. Should I make lots more and end up with a quilt or stop now at a large wall hanging? Or is it a table topper? This is one problem with winging it. You never know when to stop.

Quilt Show II


I went back to the quilt show yesterday and this time I got some photos. This wall hanging was small but interesting because the flowers are 3D.


Here is a close up of the flowers. Very small and perfectly done.


This one seemed a perfect way to showcase some gorgeous Asian fabrics.


The transition between colors on this one was absolutely perfect.


This is a double sided T shirt quilt made for a Harley fanatic. I know a few people who would love this one!


The show ends today but I probably won't go back again. I usually go on Sunday to pick up my quilts and hopefully, the prize from the silent auction. This year I have no quilts in the show and I have never won at the auction so I'll just stay home with my fingers crossed.

Saturday, May 07, 2011

Quilt Show


Yesterday I went to our local quilt show. They have lots of vendors so of course, I had to get a few souvenirs. These are all fabrics with characters that could end up in the doorways of wonky houses. I love the pig fabric. Maybe the next project will be pig styes that aren't my studio!
I am thinking of going back today to get pictures. Yesterday I just looked and visited.

Friday, May 06, 2011

Cross Quilt Borders

Yesterday I put the borders on the Cross Quilt. Now I need to cut the backing and get it on the frame. It is quite long and narrow but will probably please some tall person.

Thursday, May 05, 2011

Seniors Have it Made!


Yesterday was senior's day at JoAnn Fabrics so a friend and I went down to Grand Forks, ND to take advantage of it. I told her I was on a fabric diet but she didn't think the pile shown above was much of a diet. Lol. The white piece at the back is extra wide backing fabric that I might dye before using. The green has some glitter and one of the browns will be a narrow border for the cross quilt. I got both because I wasn't sure which brown would suit best The other two pieces are in the pile because they were irresistible. Several of the pieces, including the wide backing, were the end of the bolt so there was an extra 50% off. For the rotary blades I used a 40% off coupon that I got in the mail, so all in all I saved quite a lot of money and had a nice day out.

Tuesday, May 03, 2011

Playing on the Design Wall

I have been playing with odds and ends on my design wall. I have no idea how big this will end up but it's fun to work with colors and contrasts. There will be a lot more arranging before I call it finished.

Sunday, May 01, 2011

Thursday, April 28, 2011

More Crosses


Here is the cross quilt with the extra row and two possible border fabrics. My options seem to be:
1. Take off the top row which has the pink one I don't like much and one with the white part multi-pieced.
2. Add wider borders on the sides and a narrower one on the top to get better proportions.
3. Make it long and narrow with matching borders all around.

Without the borders it is about 45x67, a bit long and narrow. It's going to sit on the wall for awhile because it is so nice outside that I can't be in the studio all day.

Wednesday, April 27, 2011

Long Enough?


The cross patches are sewn together but I am wondering if it would benefit from one more row to make it a bit longer. I have enough white fabric to make one more row and then there will be only scraps left. I also notice now that it is up on my computer screen, that the end rows would match better if I added one row. What do you think?

Tuesday, April 26, 2011

Not Finished Yet


I thought I was finished but now that it's set out on the design wall I see that it really needs to be one row wider. Luckily the crosses are fast and easy to make and I have enough white to do six more. Hopefully I'll get at it tomorrow.

Monday, April 25, 2011

Spring!


You know it's spring when the rhubarb appears. I can't wait for the first pie!

Saturday, April 23, 2011

Book Signing

Sandy will be holding his book launch at McNally Robinson in Winnipeg.


Sandy Debreuil -- Book Launch Monday May 09 2011 7:00 pm - Grant Park in the Travel Alcove, Winnipeg

Launch of Hands of Cement: A Crowbar Benson Collection.

Crowbar Benson began as an online comic strip, but is now also seen in numerous community newspapers throughout southern Manitoba. The strip centers on Crowbar Benson, an ex-minor league hockey player who still dreams of the big time, and his two boys who cause him no end of grief. Crowbar lives in a small Manitoba town, and his adventures will ring true to anyone who’s experienced small-town life. Read it daily here.

Sandy Debreuil is co-owner of Debreuil Digital Works, a Flash game development studio, along with his brother Robin. He began writing and drawing the Crowbar Benson cartoon strip three years ago as a way to get back into doing more drawing on paper, and a little less on the computer. Naturally, he now does most of the Crowbar Benson work on the computer.

Sandy lives in Miami, Manitoba along with his wife Christine. They have four daughters.

Thursday, April 21, 2011

Crosses


I haven't been in the studio much lately but today I managed to make some more crosses. The pink one is a hand dye and there is a bit of a white patch in it. It may not make the cut, depending on how tired I get of doing these.I also don't like the one with the pink striped fabric very much. It will probably only be a small quilt because I don't have a lot of the white fabric. It is an easy and fun pattern to make if you want something scrappy and quick.

Sunday, April 17, 2011

B is for...

I finally got to the studio to make a B for Brenda's birthday. You can find her blog at Scraps and Strings. The brown strips are the table, not part of the block. I'll pop it in the mail tomorrow.

Monday, April 11, 2011

Crosses


These crosses are actually log cabin blocks arranged according to the instructions in my new Log Cabin quilt book.
I don't know if I'll do enough of them to make a quilt but it is an interesting design concept.

Sunday, April 10, 2011

New Book

My son, Sandy, has just self-published a book of his cartoons. He has been publishing an online cartoon for a couple of years and this book comes from those cartoons.
You can see the online cartoon at Crowbar Benson.

Sunday, April 03, 2011

Spring??


So much for spring here in Manitoba.
What do you get when you cross jet lag with a cold? You get a week in bed coughing and hacking. I'm just starting to feel better now although still not back to normal. I started coughing a week ago Friday. That's too long to suit me. Hopefully I'll be able to get back to the studio next week. It's been a long time.