Search This Blog

Monday, December 31, 2007

2007 Finished Quilts

My Year in Quilts.


1. Butterflies was finished in January.

2. Hot City Nights


3. Jungle4. Challenge Bag

5. Us Chickens
6. Razzle Dazzle

7. Dot Frenzy

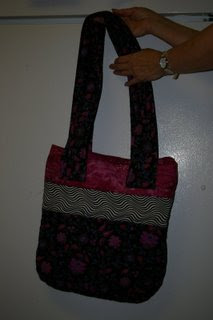
8. Pink Bag

9. Backpack

10-15. Bags
16. Big Bag

17. Merry Sunshine. Maybe I shouldn't include it because it's still on the quilting frame.18. Duvet Cover

19. Bag

20. Twist. The binding is on but not hand sewn down.
I have also finished piecing the Autumn Hills but it is not quilted yet. Winter Wonders is half done and resting in a drawer. The braids will soon be done.


Sunday, December 30, 2007

Braid Quilt


Here is where I am at with the braid quilt. I only noticed that the top corners are folded down on the rainbow one after I had the picture posted. I don't want to go all the way to the studio to take another one so you'll have to use your imagination to fold them back up. I have to decide how wide to make the sashing and borders. I might want an inner border using the colors in the braids, perhaps the rainbow one. I'm not sure if I will use the blue one because I don't want the quilt to be too wide and short. I will sew the blue one together and see how it looks.

Meanwhile, we are getting ready for a bit of a New Year's Eve party. We will snack and visit for the afternoon and evening and then near midnight we'll walk up the hill to the Stones. We will have a bonfire, a sip of Champagne to welcome in the new year and maybe a wiener roast if it's not too cold. The grandchildren will come in the afternoon so they will have time to ski and snowboard before it gets dark. I'll break out the snowshoes too but may use the excuse of cooking and entertaining to avoid any exercise. I'll start that in the new year. I have to be ready for the beach and a bathing suit in February. Now that's a sobering thought!

Friday, December 28, 2007

Boxing Day Shopping


We went shopping in Fargo on December 26 with friends from North Dakota. They took is to places we'd never find on our own, but, of course, my favorite store was Joanne Fabrics. The sales there were amazing because everything I really wanted was deeply discounted. Not shown in the photo is a 10 yard bag of white polar fleece for $20, regular $69.99 but in Canada more like $80 or more. I also found bargains on batting which I am always running low on since I got the quilting frame. In the photo are the fat quarters and blacks and white that I got. I love Karla Alexander's quilting methods so I got her latest book. I also found a flying geese ruler that I have been wanting to try. Within the family, we drew names and my SIL picked my name. Luckily, he knows just what I like best and got me the new sewing scissors which are just perfect. In spite of rotary cutters, I still use scissors a lot and a sharp comfortable pair is wonderful to have.

Tuesday, December 25, 2007

Saturday, December 22, 2007

Scraps


I have been playing with the scraps Wanda sent me. I have been thinking about doing a braid for some time and the scraps were perfect for that project. I have tried to blend the colors into each other. It still needs some tweaking now that I see it in a photo. It's amazing how you see tones more clearly in a photo. They may be too short when I get them all sewn together. Luckily, there are still lots more scraps left not to mention the pile of my own bits and pieces that I have saved up. I want to get some black to use between the braids. I always think black sets off colors the best. The photo is a little on the dark side, especially near the bottom. I suppose I could also use some sort of border print between the braids, maybe with some gold in it. I'll cross that bridge when I get to it. It might look good with piano key borders, which would use up some of the scraps that were too narrow for the braid pieces. If it turns out well, it could very well become a table topper. I don't think it will be big enough for a bed quilt.

Friday, December 21, 2007

Sew Stylish

Do you have a t-shirt that is a bit boring? Do you have jeans that you love but they have a hole somewhere? Do you have a skirt that’s too long? Or maybe some dearly loved, hand knit socks that have worn through the heel or toe? If any of these apply to you, Sew Stylish by Katie Ebben is the book for you.

The book is divided into sections including solutions to the above problems as well as my favourite, Reinventing. Who would have thought of making a loved but out of date skirt into a handbag? Or you antique handkerchief collection into a table cloth?

I have mended knitted slippers (my late father had me darning the darns, and that was mild compared with the word running through my head, but he loved those slippers). I would have done a better job of the darning if I had read this book first.

Anyone with young children knows all about holes in the knees of jeans but had you thought of an appliquéd flower instead of a regular patch? Your sons may require a different type of patch, but you get the idea.

I loved her ideas for a tier-hemmed skirt and for adding vintage lace to a cardigan. She has several ideas for customizing ready made clothing that could serve as a jumping off point for lots of creativity without having to sew the whole garment.

The last section of the book has a few templates and addresses for sources for some of the materials she uses. The addresses are all in USA but most of them have email addresses as well.

This is a small book dealing with an often ignored type sewing that most of us have to do. If you need to repair or reycle, you might as well have fun with it.

Wednesday, December 19, 2007

The Other Tree

Here is how I do the other tree. First I cut several triangles ranging in size because trees are smaller at the top.Then I sew a little strip of white to each side of the triangles and fold and press it back. The angle that you sew is up to you. I have tried a couple of different angles and you can see which you like better at the end of the post.


Turn the triangle over and trim the white off to match the green triangle.

Oops, there is a bit of green showing on the corner but I won't worry about it because it will disappear into the seam.
Add the blue background the same as for the other tree but put it on both sides of the triangle. This time, I sew the triangles all the way across, tipping them at an angle to make it look more interesting. Sew a strip of white on the bottom for snow. You could put a trunk on but I don't think you normally see the trunk on this kind of tree.
Here are two finished ones with the white sewn on at different angles. I prefer the one on the left and the top triangle is my favorite. I like the way it is more snowy on one side. It would probably look good if they were all done like that, or it might look lopsided. You can't tell until you make them. That's why I often end up with a forest when I was planning to make only one tree.

Tuesday, December 18, 2007

Tree Tutorial

Here is a little tutorial on how I do one type of pine tree.


1. I start with two strips of fabric, one green for the tree and one white for the snow. The size depends on how big you want your tree to be. Just remember that almost half an inch will be lost in the seams. I like to make different sizes so that the bottom of the tree will be bigger than the top. I also like the green to be a bit wider than the white. On this one the white is too wide and the green almost gets lost in the final tree.

2. Cut right angle triangles from the strips. The number depends on how tall you want your tree to be. As you can see, there are no hard and fast rules. Just remember that trees are never perfect shapes so a bit wonky adds to the realism.

3. Arrange the triangles and decide if you have enough of them. Then you have to add the sky. I lay a triangle on the blue piece to get the angle. Then I lay the ruler over the triangle and cut the blue fabric at the same angle. I like to use reversible fabric because I often get this wrong and then I just flip the fabric over. I like to leave lots of extra fabric on the top and ends and trim it later. That's easier than ripping out or adding more when you start to assemble the tree.


4. Once you have the sky on all the pieces arrange them so that they are offset a bit. One of the top pieces has to have extra sky on the top so that you can offset them. If you forget to do that, just sew a piece on later. Most trees in the forest don't have perfect points on the top. You can also, at this point, make a trunk. Just sew a strip of brown to a blue rectangle and sew it to the bottom of the shorter side. Sew a plain blue piece to the longer side.


5. Trim the pieces so that they are square and sew the pieces for one side together. Then sew the pieces for the other side together. Finally, decide how much you want them offset, and sew the two sides together. Press well and then square off the whole thing.


Place the tree on your design wall beside your winter house and enjoy.

Monday, December 17, 2007

Fabric Treats


Today I received a package from Wanda at Exuberant Color.
She sent me this wonderful package of scraps that are so colorful and unusual! I may have to put Winter aside and do something in color. If you love these fabrics as much as I do, head over to Wanda's blogshop, Wandaful Quilts, where you can buy quilts or kits for very reasonable prices.
Now I am going to go and play with them for awhile.

Sunday, December 16, 2007

Fairyland


Today it looks like we are living in Fairyland. The trees are covered with frost and there is the odd big fat snowflake wafting down. This was taken from our front deck.

And this one from the back deck. I'll have to go for a walk soon.

We are hosting another Raku firing today so there will be photos of that later today or tomorrow.

Friday, December 14, 2007

Another Tree


I tried a different method of doing a snowy tree. I like this one better but I need to make the snow at the ends of the triangles a bit thicker. The seam width always fools me. I think I have way too much white and then it almost disappears into the seams. I didn't put a trunk on this one because you don't usually see the trunk on that type of tree but maybe it would look better with one.

The snowflake is not as I would like it. I remember now that I was never any good at making snowflakes. Many of my Grade 3 students often made better ones. I ironed Steam-a-seam to the back of a white square, folded and cut it and then fused it to the blue. I'm not crazy about it, but it does balance out the icicles, so it may stay.

Thursday, December 13, 2007

Quilting in Provence


Quilts of Provence by Kathryn Berenson

If you are interested in the history of quiltmaking this is the book for you. This book follows the story of quiltmaking in Provence starting all the way back to the 1400’s.

The most famous type of quilting is corded white work also known in France as “embroidery from within”. This technique, similar to tarupnto (maybe it’s the same), consists of double rows of fine stitching with cotton cording stuffed between to give a raised effect. Beautiful motifs drawn from the rich Provencal countryside, including flowers, birds, animals, were formed using this method. This was most commonly made in white for the wedding bed. It was also done with bright Provencal cottons decorated with flowers and birds. The patterned quilts were usually quilted with a simple grid. Generally, they were both edged with several rows of parallel stitching.

Quilts were not the only items made using this technique. For many years quilted skirts were the height of fashion. Bed hangings, vests, jackets and baby bibs were also very popular. Marseilles needlework was shipped all over the world and had a big influence on American quilting. One interesting fact was that three identical quilts from Provence have been found, one in France, one in USA and one in England.

The most wonderful thing about this book, though, is the gorgeous photography. There are over a hundred full page illustrations and even more smaller ones. Close ups let you examine the intricate stitching. I have spent hours just looking at the pictures.

If you are really ambitious, there are ten projects in the Marseilles style for you to try. The first is a simple bed cover with a diamond grid in the middle and a traditional border consisting of seven rows of parallel stitching. Each pattern after that is more difficult, ending with an incredibly complex wedding quilt, densely quilted with a central motif of a vase of flowers. The corded baby’s bid might be a better one to start with.

Finally, there is a section giving addresses in France where you can see some of the quilts shown in the illustrations. Now I just have to get to France!

Wednesday, December 12, 2007

Snowy Tree


Here is a fir tree laden with snow. At least that's what it's supposed to be. It is snowing again here so I certainly know what they look like. I have decided to add a few pictures to my winter words just to fill in some of the blank spaces. I will also try folded snowflakes with fused fabric. I think I better practise a bit with paper first though. I haven't done one of those since I retired from teaching.

Here is the weather forecast for tomorrow.
Cloudy with 60 percent chance of flurries in the morning. Clearing in the afternoon. Blowing snow giving near zero visibility at times in the morning. Wind northwest 40 km/h gusting to 60. Temperature falling to minus 21 in the afternoon. Wind chill minus 34.
Yikes!

Monday, December 10, 2007

More Fabric


It's a good thing I'm not on a fabric diet! I went to Winnipeg today and got some backing fabric, some white cotton for dyeing and some off white muslin. That's all I was going to get until I saw fabric that looks like a stormy sea and an off white with gold polka dots. Who could resist them? Not I. The color in the photo is very yellow, I suppose because I had to use the flash. The dot fabric is really a beautiful pale cream color and the dots are glittery gold. I just love it. I'll probably regret only getting a yard of it.
What I did forget to buy was more batting. I need a list and I actually had one in my pocket but didn't look at it. I would have probably had to go to a different store and we were getting hungry so I'll just wait until we go to Winkler for groceries and get it there.

Saturday, December 08, 2007

Warming Up


I couldn't keep on with such a cold quilt so I added a nice cosy house to get warm in. I have also done a few more words. I have several more that I could make but I'm not sure how many more I can handle. I have almost hit the wall with words for now. The next thing will be trying to fit them all together into a cohesive whole.

Friday, December 07, 2007

Simple Sewing


Simple Sewing with a French Twist

Here is another one of those books that is detailed enough for a beginner and inspiring enough for the more experienced seamstress. As is usual, there is a section called Getting Started that discusses basic materials and techniques. The difference in this book is the wonderful photography used to illustrate the text. It is also surprisingly detailed with nearly 30 pages dealing with hems, seams and corners among other techniques.

The more than fifty projects are divided into groups starting with First Steps. Each group has a series of photographs illustrating the projects followed by a section of detailed instructions with hand drawn diagrams. As you would assume, these first patterns are all quite simple starting with a simple tote bag for shoes. I am tempted by both the Rive Gauche Carryall (more bags???) and the French Wool Beret.

There are projects for the home ranging from the kitchen to the bathroom to the patio. How about His and Hers Laundry bags? Or a duvet cover? Too bad I already made mine. The Wardrobe Concierge (AKA Garment Bag) looks useful for the closet. I love the Garden Artist’s Apron, which would be just as appealing for the kitchen or art studio.

The last part of the book is a Fabric guide for each section. The Fabrics and trims are listed along with their manufacturers and the name of each particular fabric. She discusses the reasons for her choices, which would be helpful if you want to use different fabrics but keep the same look. Finally, there are patterns that can be enlarged to make the projects that require a pattern.

Each section is printed on different colored pages to make it easier to find a particular project. This book is appealing for the photography as much as the patterns. With over 250 pages you will never run out of wonderful items to sew. I know I will be referring to it again and again.

Thursday, December 06, 2007

Another one Done


I quilted another one today. I was much faster at loading this one. I had already pieced and squared up the backing so that helped. I had to sew two pieces of batting together but I felt very good about stash busting my batting. I have a lot of small pieces of batting that take up a LOT of room. I think I'll have to make some pillows or a big long bolster. Anyway, once the quilt was loaded it really didn't take long to quilt it. I only had to change bobbins once so that was a help. It is not a very big quilt, only about 5 feet square but it will be a nice lap quilt or kid's quilt. My pile of "to be quilted" is shrinking but my pile of "to be bound" is growing.
I don't know if you read Pat Sloane's blog, but even if you aren't a regular reader, pop over there and leave a comment. She knows she has over 1000 visitors a day and is trying to get 1000 comments. Talk about flushing out the lurkers! When I last checked she was only at 365. Only 365? I am stoked if I get over 20 comments!

Wednesday, December 05, 2007

Much Better


I finished the second quilt on the new frame and did much, much better this time. I learned that you have to spend more time loading it properly than in the actual quilting. I used the waves panto that came with the frame. At first I had a bit of trouble with the speed control but when I lowered the speed on the machine I had no more problems. I have the binding sewn on, but not hand sewn down. I used left over binding that I have been saving from other projects, perfect for a scappy quilt.

Tuesday, December 04, 2007

Not Quite So Wonderful


It has been snowing hard all night. We usually go to town to grocery shop on Tuesdays. We should have gone on Monday this week. We went in spite of the snow and made it all the way into the yard before getting stuck. We did have a bit of trouble in the lane but managed to make it. This is not as bad as it looks. Five minutes of shoveling and we were out, turned around and plugged in. It's supposed to go down to -28 tonight so the car has to be plugged in if we want to start it.I'm not sure why we would start it though, because I'm pretty sure we can no longer get down the lane. Still, it's incredibly beautiful and so silent.


I made a few more luggage tags. I found out that it's a great way to use up a lot of 4 inch orphan blocks that I have sitting around. I sew two together, line them, sew a bit of plastic to the lining for the name card (you could sew the name on the lining or just use a pen to write it on), interface and sew them together with a string of some sort at one corner. Turn them, add a bit of velcro and voila!

Monday, December 03, 2007

Luggage Tags

This morning I made a backing for another UFO so that when I get some batting I will be able to get right at it. Making backing is not my favorite part and I've found out that it's really, really important to get it perfectly square when you are using the frame.


For a little fun break after that I made some luggage tags. I saw some on Morah's blog and on a couple of craft sites and thought that it was a great idea. I combined several of the patterns and came up with these. We are going to be traveling to Australia and China in Feb and March and we need some sort of easy identification for our bags. I still need a few more. It's a great way to use up those little bits of fabric that you love but don't have much of. That sentence looks like poor grammar but you get my meaning.

Sunday, December 02, 2007

Winter Wonders


Today the sun is shining again after a couple of days of snow. It is really a winter wonderland out there and hunting season is over so we can go out and enjoy it without the fear of being shot at.
The picture is of the trail we have made walking to our studio. It's only -16 and not windy at all so it will be a great afternoon for a walk.


I started loading the next quilt on the frame, trying to correct the numerous loading mistakes I made on the first one. The front of the finished one looks all right but the back is pretty lumpy and wavy around the borders. I'll put a binding on it anyway and it can live in the car for the winter or on the couch.